Sunday 15 December 2013

Baked: Blueberry Scones!


Blueberry Scones (Makes 6 - 8 pieces)
- 2 1/3 cup sifted flour
- 1/2 teaspoon baking powder
- 1 egg yolk
- 2 egg whites
- 1/3 cup full cream milk
- 1/3 cup chilled butter
- 3/4 cup caster sugar (or 1/2 cup white and 1/4 cup brown sugar)
- 1 1/2 teaspoon salt
- 1 cup blueberries

1. Preheat oven to 375 degrees F / 190 degrees C
2. Cut butter into small squares. Whisk eggs. Add the eggs and vanilla essence into the butter.
3. Combine all dry ingredients together (flour, salt, baking powder)
4. Pour in dry ingredients, gently mix and alternate with the milk and mix again.
5. Texture should be pretty thick and tough. Add in blueberries and mix, do not overhandle.
6. Optional: Divide dough into 6 - 8 pieces into slightly floured board to mould into balls.
7. Bake on baking sheets for 20 - 22 minutes until golden brown edges form.

Enjoy these scones WARM ! They were super delish. If they are no longer warm, just toss it into the microwave for 45 seconds to do the trick.

Tip: Make sure the blueberries do not come out of the scones when you scoop them out and make them into moulds or else you will have blueberries lava just like the pic above hehe. xx

Baked: Cupcakes with Fondant Toppers


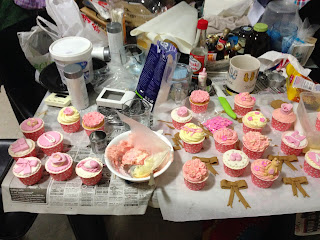
The production house, literally!


The project was for a girl's first birthday, so it I thought it would be cute to have a safety pin in one of the fondant decorations.


 To this date, my strength is still in butter icing. The person who ordered wanted the pink carnation design in the end -- phew! less fondant, more yummy butter cream :).


The end result was actually a dessert table. Unfortunately, I could not attend the event because I died from exhaustion lol. I just started to make dessert tables, so if you want to order, please do so 2 - 3 months in advance so I can customize each and every element for you! (: 


Baked: Lemon Cupcakes with Christmas Fondant Toppers


These lemon cupcakes turned out super fluffy and light. It's not the norm, but it was getting close to a light cheese cake texture. The trick is to add one more egg, slightly more butter, slightly less flour and also bake it at lower temperature but longer time... Yup!


 I made these Christmas fondant toppers for an order this week!
December = Time of Christmas Orders = Fondant fondant fondant


Wednesday 13 November 2013

Baked: Alcoholic Mojito Cupcake


Still trying to perfect the recipe. First attempt. Good try though.
My brother was looking for more the next day (:


Most recipes only use the mint leaves for garnish, but I thought 'WHAT? these amazing fresh mint leaves not going to be used at all? what a waste...' So I plucked out about 4-5 mint leaves and the flavour was just nice when eaten. Not to strong. It was just a hint. 4 - 5 mint leaves chopped into the icing before being pipped. Really good!


Oh, and I finally went to D'Good Cafe today at Holland Village. I had their special earl-lavender tea latte. It's ironic how they use a calming flower with a black tea hahaha. But I thought it was really nice. Not amazeballs, but great. Get a cup and try one yourself!

Monday 11 November 2013

Baked: Christmas Fondant Cupcakes


I was playing with some fondant today just to think off rough ideas for christmas orders... I'm usually good with buttercream icing (whatever the flavor that I improvise with), so fondant was pretty new. That's why it's still messy. Beginner fondant noob uh oh. 


Friday 8 November 2013

Baked: Teh Tarik Cupcakes


I went to phoon huat (specialty bakery store) just to get my M1 / Open Star Tip / Rosette Tip just to make the frosting look like this. It's such a hype nowadays and of course... I wanted to jump into the bandwagon (: First time baking Teh Tarik Cupcakes, and I'm pretty satisfied with the results. Hurray!


Recipe: Teh Tarik Cupcakes

Teh Tarik Cupcakes (Yields 10-12)
- 1/2 cup butter (room temperature)
- 3 eggs
- 1 cup plain flour
- 1 teaspoon vanilla essence
- pinch of salt (optional)
- 2 packs of teh tarik mix (each pack was 40g)
- 4 tablespoon of hot water
- 1/2 cup white sugar
- 1/2 cup brown sugar
- 1/4 teaspoon bicarbonate of soda
- 1/3 teaspoon baking powder

Instructions:
1. Pre-heat oven at 175 degree celcius for 20 minutes.
2. With the soft butter at room temperature, mix with the white sugar and brown sugar. Mix well until it has a consistent texture. Whisk 3 eggs and slowly mix into the wet mixture. Add the vanilla essence. Mix slowly.
3. Sift in plain flour with baking soda, bicarbonate soda, and salt. Slowly mix into the wet mixture little by little.
4. Use the 4 tablespoon of hot water and dissolve the Teh Tarik Sachets. The consistency should be peanut butter-like. Add into the mixture bit by bit and slowly mix.
5. Use the mixer and put in on slow speed for 1 minute, and then on high for 5 - 7 minutes.
6. Put into mixture into cupcakes cases and bake for 18 - 22 minutes.
7. Put on cooling rack for 10 minutes before putting the icing on top of each cupcake.

Teh Tarik Buttercream Frosting (For 7 cupcakes)
*I do not make a lot of icing because my family is health conscious. So I suggest you double the measurements if you want the usual yield as most recipes.
- 1/2 cup butter (room temperature)
- 1 1/2 cup sifted power/icing sugar
- 1 pack of Teh Tarik Mix (each pack was 40g)
- 4 teaspoon (about 1 tablespoon) of milk

Instructions:
1. Beat the butter for around 2 - 3 minutes to incorporate air until it becomes soft.
2. Gradually add icing sugar at low speed, and then medium speed for 3 minutes.
3. Add in one packet of teh tarik powder sachet bit by bit on low speed.
6. Add 3 - 4 teaspoon of milk and beat at low speed.
5. Increase speed to high for about 5 - 8 minutes to blend everything together.


Tuesday 5 November 2013

Ate: Carpenter and Cook


I went to 21 Eng Kong Terrace to try Necessary Provision's coffee today but it was closed :(. So my brother and I drove to Carpenter and Cook instead since it was nearby.


I guess Carpenter and Cook was still in the 'halloween' spirit, don't you think?

The location is at 19 Lorong Kilat. I would also recommend Kim's Family Korean Restaurant nearby. It was a hit a few years back, but I think patronage have decreased because of the cafe-craze. There's also udders in this road. Probably one of the first few branch to open in Singapore. Go try the alcoholic ice cream flavours :) they are delish.


My brother said my Sakura Tea is similar to the one I ordered in France. And I agree! I love earl grey, english breakfast and chamomile. But I also like fruity teas... I've always liked Sakura tea! You should try some too. There's about 6 - 7 choices of teas available at Carpenter and Cook.


And this passion fruit tart was superb! I tried it because it was recommended by Lady Iron Chef in Singapore at his instagram. And I thought it was amazing. The burst of passionfruit flavor was awesome and refreshing. Although it is pretty small, and costs $6 I think it's still worth to try. Yummy

Monday 4 November 2013

Baked: Lemon Cupcakes with Butter Cream Icing


Before heading into the oven...


How the lemon cupcakes looked like after some oven lovin'
(Golden brown edges are mandatory!!!)


Would you like to try some labor of love? (:


I rushed this batch of cupcake orders for a friend today. Wish I had more time to do proper pipework for the white icing. Nonetheless, I'm pretty happy with the pink ones. Time to get my rosette piping tip soon... (:

Friday 1 November 2013

Cooked: Dutch Macaroni Schotel


The finished product: Dutch Macaroni Schotel.
It is firm and soft (not gooey) on the inside, has crispy cheese layers all over, and tastes really good. Here's the recipe that I made to bake this amazing dutch dish today.

Dutch Macaroni Schotel
- 250g of macaroni
- 6 eggs
- 1 cup milk
- 1/2 cup cream (35% - 40% fat)
- 8 slices of cheese
- 150g of ham (about 6 slices)
- 150g of luncheon meat
- 1 yellow onion
- pinch of black pepper (1/2 teaspoon)
- pinch of white pepper (1/4 teaspoon)
- pinch of nutmeg (1/4 teaspoon)
- pinch of sugar (1/2 teaspoon)
- salt (2 teaspoon)

Directions:
1) Boil and cook the macaroni. (Takes about 18 minutes)
2) Whisk the milk, cream, and FOUR eggs together.
3) Sauteed the onion until light brown golden color. Add in the luncheon meat and fry it for about 2 minutes until the meat becomes more firm and slightly charred.
4) Put the macaroni in, and slowly stir.
5) Pour in the milk/cream/four eggs mixture. Add the salt, pepper, nutmeg and sugar into the sauce pan or wok. Mix well for about three to five minutes.
6) Add in 3 cheese slices that are cut into small pieces.
7) Whisk the 2 other eggs and add into the saucepan.
8) Grease your pot using butter or oil spray if you have.
9) Pour in everything from the saucepan into the pot.
10) Put 5 slices of cheese on top of the mixture. Cover with lid.
11) Bake it for 1 hour - 1 hour 15 minutes at 180 degree celcius.
12) Let it cool for a few minutes and enjoy :)


This picture above illustrate how your saucepan should look like with the sauteed onions, luncheon meat and macaroni, before adding in the wet mixture.


This picture illustrates how your saucepan should look like after adding in the cheese and additional whisked eggs. This should be the consistency and texture of the mixture before putting into the pot to bake.

Tuesday 29 October 2013

Baked: Banoffee Pie


I like to take pictures of the ingredients I will use, I think it's really fun (:


I made two types of pie crusts. This is the shortbread crust. I didn't use a food processor and it was fine. It just look longer. The recipe is really simple, but I didn't nail the timing of the oven right. This is a new pie crust recipe I tried. So I guess mistakes make me learn? Hahaha (optimistic much). My crust rose up too high. I think I got too excited with the number of pokes I did with the fork... Here's the recipe: Joy of Baking



Here's the graham cracker / digestive biscuits crust I did. This one was really simple. Also no food processor, that's why my crust was still a bit lumpy :(. But it tasted good!


And here's the final product: Banoffee Pie. It originates from UK in 1972, it's basically a combination of bananas and toffee. What can I say... It was so good!!! Felt like I went to banana heaven. I was wondering why the pie looked messy on masterchef australia, but after making it myself I understood why. So delish!

Recipe for Banoffee Pie:

Graham / Digestive Biscuits Crust:
- 6 pieces of digestive biscuits
- 8 tablespoons of melted butter

Use a food processor to blend the crust into small fine pieces. If you do not have a food processor, use a plastic bag and put the biscuits inside. Crush the biscuits into small pieces. Press the fine digestive biscuits onto the pie pan. Pour in the melted butter evenly on top. Put in the fridge for 20 - 25 minutes until harden. 

Toffee:
- 1/2 cup water
- 1/2 cup milk
- 4 tablespoons of butter
- 2 teaspoon of vanilla essence
- 2 cups caster sugar

Pour all the ingredients into a saucepan. Put on high heat and stir occasionally it prevent it from sticking onto pan and re-crystalizing. Optimum heat should be at 285 degrees Fahrenheit or 140 degree Celsius. The mixture will be brown and gooey, it's important to use it quickly before it hardens super fast. Immediately pour into your crust once it's out of the fridge.

Topping:
- 1 1/4 cup of whipped cream (35%-40% fat content is a must)
- 1/4 cup of icing sugar / powder sugar
- 2 medium-sized bananas
- 1/2 teaspoon of coffee/chocolate powder (optional)

Put the whip cream, and use a mixer with high speed for about 2 minutes. Add in the icing sugar and continue on high speed until it peaks on the top (usually after 5 minutes). Slice the bananas into small pieces. With the crust below, and toffee on top, put the sliced bananas to create one or two layers. Put all the whipped cream, and dust with instant coffee or chocolate powder on the top. Enjoy!


Wednesday 23 October 2013

Coffee: Jamaican Blue; Dinner: Nandos Chicken; Sketched: Charcoal


Had a Skinny Latte at Jamaican Blue just now. Pretty awesome. The highlight is definitely THE FOAM. Only $5.60 and I think it was worth it (:


For dinner, had some really awesome peri peri Nandos chicken! Ate dinner with dad and sis. Really glad to have time to talk and catch up with them.


And I know this isn't actually a picture of food or drinks... but I sketched this today and I'd like to remember it few months or years down the road. I think its very imperfect, but I guess it's pretty satisfactory considering I finished it within fifteen to twenty minutes. Was really happy to use charcoal, haven't used that medium for a few years hehehe. Hurrah!!!

Wednesday 16 October 2013

Cooked: Rosemary Garlic Butter Chicken


So I wanted to bake some chicken with Olive Oil and lemons but both ran out :(. First time experiencing the state of cooking without any olive oil -- was terrible. But I improvised and made rosemary garlic butter chicken instead.


Looked like I murdered one whole chicken with this mess when I bought my ingredients from the supermarket ;).


Before the pot went to the oven... 


The result after I took out of the oven :)

Recipe: Rosemary Garlic Butter Chicken (serves 4)
- half a chicken (already cut into pieces)
- 8 tablespoon of butter
- 1 1/2 teaspoon of rosemary
- pinch of salt
- pinch of white pepper
- pinch of blackpepper
- pinch of nutmeg
- 1 whole garlic
- 3 small pieces of shallots
- 5 vegetable oil
- 1/2 lime

Put the shallots onto frying pan, pan sear the chicken for about 4 - 7 minutes to get crispy char-grilled skin. Some of the meat of the bigger pieces of chicken should still be pink. Add salt for taste. Put into a pot vegetable oil, mixed with fresh garlic. Put the chicken into the pot, and add in the rosemary, nutmeg, blackpepper. Put the butter around and spread evenly inside the pot on top of the chicken. Squeeze in fresh lime and cover with lid. Bake in the oven at 177 degree celcius for about 25 - 27 minutes. Chicken should be tender and soft because of the butter that has infused inside the chicken ♥__


What I served to my mom. I really enjoyed making this because pan frying the chicken really helps to give it more char-grilled feel and taste. The butter also made the chicken really tender and soft, although I ate the breast. So yummy!

Tuesday 15 October 2013

Baked: Chocolate Chip Cookies


Chocolate Chip Cookies. I sold over 300 hundred of the awesome cookies for friends who ordered them just to eat for own consumption or for them to give away.


Such was the packaging that I did for a friend who wanted to give away chocolate chip cookies for a birthday party. I loveeee using Vanhoutten chocolate chips!

Ate and Prepared: Fruit Tart and Sticky Date Pudding


Ate this fruit tart from Baker and Cook. I'd recommend their bread though, not their pastry. I think the best fruit tart in Singapore is still the one made in Delifrance. And I'm not the only person who thinks that way! 


Plating I did for a Sticky Date Pudding in the restaurant I used to work in called 8@Green. Too bad the restaurant closed down, the owner wanted to go to Australia to further her studies and knowledge in making awesome pastry and desserts. I used to plate a lot of these desserts when I was working there, was a true privilege, and I learnt a lot! Loved it. <3 

Prepared: Yogurt 'Parfait'


Prepared Yogurt 'Parfait' today. This is because I didn't exactly chill it. It's made out of yogurt, bananas, cereal and rolled oats. Really healthy and quick to prepare. Suitable for all ages!

P.S. I recommend using greek yogurt instead, although they are more expensive, they are a lot healthier. And like everyone say, 'health is wealth'. (:


Friday 11 October 2013

Baked: Rainbow cupcakes / Lemon cupcakes


Snaps of past Rainbow Cupcakes I did for a Birthday Party about two months ago (?). I prefer doing events because I get to decorate and make it really personalized. I think thats the difference between commercial and mass produced cupcakes vs personalized home bakers (:


These were Lemon Cupcakes with Royal Icing. Did purple flowers because that was the buyer's favourite color. Should decorate with pearls and balls next time, what do you think? (:

P.S. Spamming a lot of posts because I've been wanting to blog all these things for three to four months but only decided to really do it recently hahah.