Showing posts with label bake. Show all posts

Saturday, 30 August 2014

136 Cupcakes + 5" Cake


Just completed this today at Jurong Country Club:
Flavours included: chocolate, vanilla, lemon and banana. LOVED the banana recipe! Going to make some more soon :) Here's a snap shot of the banana cupcakes below. 


I also loved the fondant pieces on the 5" cake... was fun to do a batik / peranakan theme indeed!

It's been great to bake after SO long... been so busy at work. Now that I'm currently unemployed I could bake all I want hahaha. It's so refreshing since I've not baked for more than what... 3 months? Here's to more baking yay!! :) Till then folks. xx

Saturday, 19 April 2014

Artichoke at Singapore


Salmon Pancakes


Bacon and Scrambled Eggs


Mushrooms and Scrambled Eggs (with grilled cheese!)


Love the ambiance throughout the entire cafe. This is what you would see presently if you are waiting in line... 


As I have mentioned, the ambiance throughout the entire cafe was awesome. A really nice place to just chill out.


I thought the food was okay (scrambled eggs soggy and too wet and moist, bread weren't crispy enough), the coffee was okay (correct temperature, quantity was sufficient, the roast was pretty good but the accuracy of the foam for the various drinks weren't really precise). Nonetheless, great customer service and excellent location / ambiance. Worth the visit, defo. Although I'd stick to my other cafe favourites.

P.S. Apologies for not having to update for quite some time. Have been more active writing on my main lit blog (www.plighttowrite.wordpress.com). These pictures aren't perfect, but I do hope that they are good enough. Am trying to self-learning photography with my sister's Canon DSLR.

Till then, cheerios.

Artichoke
161 Middle Road, Sculpture Square, Singapore 188978

Saturday, 11 January 2014

Baked: Xmas Fondants (Mocha Cupcakes with Coffee Butter Icing)


Just an order I did a few weeks back but haven't had the time to upload em. I LOVED the coffee butter cream icing. Probably because I love coffee, but also because the coffee flavor came out just about right (taste and hint) with the butter cream. I used Hershey's melted chocolate, Hershey's cocoa powder and Boncaffee coffee for the mocha cupcakes. Tasted pretty decent. :)

Didn't know I'd be selling fondant toppers... guess the first order really made me get it goin' with fondant!


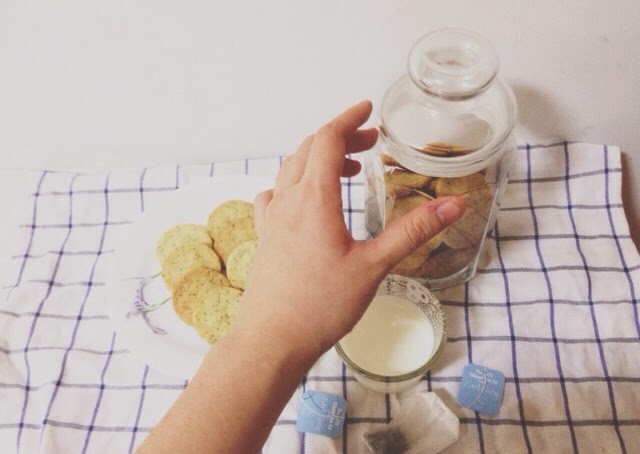
Baked: Earl Grey Shortbread Cookies


I used Clipper Earl Grey tea leaves because it is strong, aromatic, and most importantly fine. If you have the original Earl Grey loose tea leaves, you need to put it into a food processor first because the taste will come through when the texture is fine.

(Note, for cupcakes / cakes, earl grey are usually melted and cooked in butter for the flavor to come through. For cookies, fine tea leaves would be sufficient)


What the batter looked like before putting it into the oven. Sorry for not editing the lighting!


What the shortbread cookies looked like after coming out of the often... As you can see, they are quite thick. Try to get them to be slightly less than 1cm in height when you pop em into the oven.


Earl Grey Shortbread Cookies (Makes about 45 bite-size pieces)
- 2 1/4 Cups all purpose flour
- 2 teaspoon of earl grey tea leaves (fine)
- 3/4 cups of caster sugar
- 1 teaspoon vanilla extract
- 1/2 teaspoon salt
- 1 cup of butter (room temperature)

Instructions
1. Mix the the butter (must be room temperature) with the sugar for about 5 - 7 minutes (you can use electric mixer on low or by hand because cookies do not have to be extremely smooth like cupcakes/cakes)
2. Add the vanilla extract, mix well.
3. Add the flour and the salt in, until it is slightly tough and easy to knead.
4. Lastly, put in the fine earl grey tea leaves into the batter. Mix with spoon (do not use electric mixer here because you might change the texture of the batter)
5. Knead. Yes, knead. I tried to use my non-stick roller pin to no avail. Knead the dough because it requires warmth from the hands. Knead for about 10 minutes until the dough is slightly 'flexible' but firm.
6. Make the dough flat (about 1cm in height for your own convenience) and put in plastic wrap. Refrigerate for only 20 minutes*. Anything beyond that makes the dough really tough and requires more time to thaw before baking.
7. Have fun cutting them out and bake them at 360 degrees F or 180 degrees C for about 12 minutes until edge becomes golden brown.
8. Leave it to cool on the parchment paper for 5 minutes, before putting them in cooling racks.

P.S. I will be trying earl grey BUTTER cookies in the future, but I need to get on experimenting matcha and tiramusi cupcakes because it was highly recommended by friends who would like to try and order :). 

Hope you guys will like this recipe! Enjoy with tea, milk or coffee in the late afternoon. Cheerios 

*Note: The reason why you need to refrigerate for 20 minutes, cut them out and pop em into the often is to make sure that the cookies are consistent. If you put them in the refrigerator for too long, then the dough might rise and you will have uneven cookies when you bake them in the often. Although this only affects cosmetic purposes, the taste is still the same.

Sunday, 15 December 2013

Baked: Blueberry Scones!


Blueberry Scones (Makes 6 - 8 pieces)
- 2 1/3 cup sifted flour
- 1/2 teaspoon baking powder
- 1 egg yolk
- 2 egg whites
- 1/3 cup full cream milk
- 1/3 cup chilled butter
- 3/4 cup caster sugar (or 1/2 cup white and 1/4 cup brown sugar)
- 1 1/2 teaspoon salt
- 1 cup blueberries

1. Preheat oven to 375 degrees F / 190 degrees C
2. Cut butter into small squares. Whisk eggs. Add the eggs and vanilla essence into the butter.
3. Combine all dry ingredients together (flour, salt, baking powder)
4. Pour in dry ingredients, gently mix and alternate with the milk and mix again.
5. Texture should be pretty thick and tough. Add in blueberries and mix, do not overhandle.
6. Optional: Divide dough into 6 - 8 pieces into slightly floured board to mould into balls.
7. Bake on baking sheets for 20 - 22 minutes until golden brown edges form.

Enjoy these scones WARM ! They were super delish. If they are no longer warm, just toss it into the microwave for 45 seconds to do the trick.

Tip: Make sure the blueberries do not come out of the scones when you scoop them out and make them into moulds or else you will have blueberries lava just like the pic above hehe. xx

Baked: Lemon Cupcakes with Christmas Fondant Toppers


These lemon cupcakes turned out super fluffy and light. It's not the norm, but it was getting close to a light cheese cake texture. The trick is to add one more egg, slightly more butter, slightly less flour and also bake it at lower temperature but longer time... Yup!


 I made these Christmas fondant toppers for an order this week!
December = Time of Christmas Orders = Fondant fondant fondant


Wednesday, 13 November 2013

Baked: Alcoholic Mojito Cupcake


Still trying to perfect the recipe. First attempt. Good try though.
My brother was looking for more the next day (:


Most recipes only use the mint leaves for garnish, but I thought 'WHAT? these amazing fresh mint leaves not going to be used at all? what a waste...' So I plucked out about 4-5 mint leaves and the flavour was just nice when eaten. Not to strong. It was just a hint. 4 - 5 mint leaves chopped into the icing before being pipped. Really good!


Oh, and I finally went to D'Good Cafe today at Holland Village. I had their special earl-lavender tea latte. It's ironic how they use a calming flower with a black tea hahaha. But I thought it was really nice. Not amazeballs, but great. Get a cup and try one yourself!

Friday, 8 November 2013

Baked: Teh Tarik Cupcakes


I went to phoon huat (specialty bakery store) just to get my M1 / Open Star Tip / Rosette Tip just to make the frosting look like this. It's such a hype nowadays and of course... I wanted to jump into the bandwagon (: First time baking Teh Tarik Cupcakes, and I'm pretty satisfied with the results. Hurray!


Recipe: Teh Tarik Cupcakes

Teh Tarik Cupcakes (Yields 10-12)
- 1/2 cup butter (room temperature)
- 3 eggs
- 1 cup plain flour
- 1 teaspoon vanilla essence
- pinch of salt (optional)
- 2 packs of teh tarik mix (each pack was 40g)
- 4 tablespoon of hot water
- 1/2 cup white sugar
- 1/2 cup brown sugar
- 1/4 teaspoon bicarbonate of soda
- 1/3 teaspoon baking powder

Instructions:
1. Pre-heat oven at 175 degree celcius for 20 minutes.
2. With the soft butter at room temperature, mix with the white sugar and brown sugar. Mix well until it has a consistent texture. Whisk 3 eggs and slowly mix into the wet mixture. Add the vanilla essence. Mix slowly.
3. Sift in plain flour with baking soda, bicarbonate soda, and salt. Slowly mix into the wet mixture little by little.
4. Use the 4 tablespoon of hot water and dissolve the Teh Tarik Sachets. The consistency should be peanut butter-like. Add into the mixture bit by bit and slowly mix.
5. Use the mixer and put in on slow speed for 1 minute, and then on high for 5 - 7 minutes.
6. Put into mixture into cupcakes cases and bake for 18 - 22 minutes.
7. Put on cooling rack for 10 minutes before putting the icing on top of each cupcake.

Teh Tarik Buttercream Frosting (For 7 cupcakes)
*I do not make a lot of icing because my family is health conscious. So I suggest you double the measurements if you want the usual yield as most recipes.
- 1/2 cup butter (room temperature)
- 1 1/2 cup sifted power/icing sugar
- 1 pack of Teh Tarik Mix (each pack was 40g)
- 4 teaspoon (about 1 tablespoon) of milk

Instructions:
1. Beat the butter for around 2 - 3 minutes to incorporate air until it becomes soft.
2. Gradually add icing sugar at low speed, and then medium speed for 3 minutes.
3. Add in one packet of teh tarik powder sachet bit by bit on low speed.
6. Add 3 - 4 teaspoon of milk and beat at low speed.
5. Increase speed to high for about 5 - 8 minutes to blend everything together.


Monday, 4 November 2013

Baked: Lemon Cupcakes with Butter Cream Icing


Before heading into the oven...


How the lemon cupcakes looked like after some oven lovin'
(Golden brown edges are mandatory!!!)


Would you like to try some labor of love? (:


I rushed this batch of cupcake orders for a friend today. Wish I had more time to do proper pipework for the white icing. Nonetheless, I'm pretty happy with the pink ones. Time to get my rosette piping tip soon... (:

Tuesday, 29 October 2013

Baked: Banoffee Pie


I like to take pictures of the ingredients I will use, I think it's really fun (:


I made two types of pie crusts. This is the shortbread crust. I didn't use a food processor and it was fine. It just look longer. The recipe is really simple, but I didn't nail the timing of the oven right. This is a new pie crust recipe I tried. So I guess mistakes make me learn? Hahaha (optimistic much). My crust rose up too high. I think I got too excited with the number of pokes I did with the fork... Here's the recipe: Joy of Baking


Here's the graham cracker / digestive biscuits crust I did. This one was really simple. Also no food processor, that's why my crust was still a bit lumpy :(. But it tasted good!


And here's the final product: Banoffee Pie. It originates from UK in 1972, it's basically a combination of bananas and toffee. What can I say... It was so good!!! Felt like I went to banana heaven. I was wondering why the pie looked messy on masterchef australia, but after making it myself I understood why. So delish!

Recipe for Banoffee Pie:

Graham / Digestive Biscuits Crust:
- 6 pieces of digestive biscuits
- 8 tablespoons of melted butter

Use a food processor to blend the crust into small fine pieces. If you do not have a food processor, use a plastic bag and put the biscuits inside. Crush the biscuits into small pieces. Press the fine digestive biscuits onto the pie pan. Pour in the melted butter evenly on top. Put in the fridge for 20 - 25 minutes until harden. 

Toffee:
- 1/2 cup water
- 1/2 cup milk
- 4 tablespoons of butter
- 2 teaspoon of vanilla essence
- 2 cups caster sugar

Pour all the ingredients into a saucepan. Put on high heat and stir occasionally it prevent it from sticking onto pan and re-crystalizing. Optimum heat should be at 285 degrees Fahrenheit or 140 degree Celsius. The mixture will be brown and gooey, it's important to use it quickly before it hardens super fast. Immediately pour into your crust once it's out of the fridge.

Topping:
- 1 1/4 cup of whipped cream (35%-40% fat content is a must)
- 1/4 cup of icing sugar / powder sugar
- 2 medium-sized bananas
- 1/2 teaspoon of coffee/chocolate powder (optional)

Put the whip cream, and use a mixer with high speed for about 2 minutes. Add in the icing sugar and continue on high speed until it peaks on the top (usually after 5 minutes). Slice the bananas into small pieces. With the crust below, and toffee on top, put the sliced bananas to create one or two layers. Put all the whipped cream, and dust with instant coffee or chocolate powder on the top. Enjoy!


Friday, 11 October 2013

Baked: Rainbow cupcakes / Lemon cupcakes


Snaps of past Rainbow Cupcakes I did for a Birthday Party about two months ago (?). I prefer doing events because I get to decorate and make it really personalized. I think thats the difference between commercial and mass produced cupcakes vs personalized home bakers (:


These were Lemon Cupcakes with Royal Icing. Did purple flowers because that was the buyer's favourite color. Should decorate with pearls and balls next time, what do you think? (:

P.S. Spamming a lot of posts because I've been wanting to blog all these things for three to four months but only decided to really do it recently hahah.


Baked: Sturdy Whipped Cream Frosting


So apparently the cupcake icing was a hit among the people who ate the cupcakes: the sturdy whipped cream. I improvised the recipe myself because I dislike runny icing -- I mean, who does like it, right? The problem with this recipe is that I tend to agar (a Singaporean lingo, meaning 'estimate') my measurements and I just go along with the texture when I feel that it is acceptable. Nonetheless, I decided to post it because a friend requested (:


Sturdy Whipped Cream Frosting (For 9 Cups):
- 3 / 4 cup Nestle Cream
(I only use the thick part, not the runny watery thing inside the can)
- 2 1/2 cup of Icing Sugar
- 3/4 cup Unsalted Butter
- 1 teaspoon vanilla essence
- 1 teaspoon of rum *optional

It's also important to make sure that the butter is slightly cold, below room temperature and soft. This is the usual case for most whip cream frosting.

- Blend the butter on low-speed until becomes moist and soft
- Sift in the 2 cups of icing sugar bit by bit and blend on low speed (until it becomes fluffy)
- Add in vanilla essence and rum
- Add in Nestle Cream and blend on low speed
- Sift in left over icing sugar on low speed for 2 mins and med speed for 1 minute

the most important part here is to not over blend because the whole icing might separate and fail.

I'd also recommend adding in 1 cup of heavy cream (not low fat). This is because fat holds icing together to prevent it being runny. Have fun!

Thursday, 10 October 2013

Baked: Swiss Meringue Banana Chocolate Chip Muffins, Barista: Latte Art


Some of you guys who know me personally would have known by now that I bake once in a while. I baked these meringue banana chocolate chip muffins a few months back. I thought I should post it as well in case people need to see sample pictures. Mmmhmm. Need to get better packaging though since I usually sell cupcakes and cookies.


I know Baristas get low pay, well most F&B service jobs do. But I don't think I can explain the happiness or joy whenever I make coffee, for myself or for my customers. The temperature for this cappucino was great, but I forgot to polish the milk and pop the bubbles (opps! big mistake). Thankfully you can still see the Hello Kitty latte art I was trying to achieve.